//ArrowChat Code
Page 2 of 2 FirstFirst 1 2
Results 16 to 19 of 19

Thread: Build: My 82 ATC110

  1. #16
    Join Date
    Feb 2024
    Location
    McPherson Kansas, USA
    --
    16
    After messing with the sub-transmission the other day, I decided to figure out why my rear axle had play, and why my brakes didn't work. So, I began working on disassembling the rear end!
    I'm sure you all know the drill with disassembling these, but this was exploratory surgery for me. The jam nuts for the drum were a major pain, requiring the biggest wrench I could find, two cheater pipes, and a friend. Based on the condition of this machine I suspect the rear end has never been apart.
    Click image for larger version. 

Name:	PXL_20240309_230646254.jpg 
Views:	25 
Size:	841.0 KB 
ID:	271287
    Under the brake drum I found the reason the brakes didn't work: corroded shoes and a failed lining. I was hoping to reuse these shoes but I'm not so cheap as to try gluing them back together... new shoes are on the way.
    Click image for larger version. 

Name:	PXL_20240309_232157133.jpg 
Views:	20 
Size:	940.0 KB 
ID:	271288
    With the brake assembly off I was confronted with some bent and battered backing plates. The chain backing plate came off easily, but the drum backing plate has been welded onto the skid plate, which is all welded into the rear grab bar through someone's homemade tow hitch installation. It's ugly but I'm not ready to undo all of that, so I carefully took it all off in one piece.
    Click image for larger version. 

Name:	PXL_20240310_000844171.jpg 
Views:	20 
Size:	982.7 KB 
ID:	271289Click image for larger version. 

Name:	PXL_20240310_000855462.jpg 
Views:	31 
Size:	821.0 KB 
ID:	271290
    Finally, it is on to the axle bearing retainer. The housing is luckily in good shape, but the bearings and seals in it were completely shot. It looks like someone submerged the axle in water with how much rust and mud is in there. No wonder my rear axle had play!
    Click image for larger version. 

Name:	PXL_20240310_000910637.jpg 
Views:	21 
Size:	485.7 KB 
ID:	271291
    Nothing to do but renovate. A seal puller took care of the seals and a punch popped the old bearings out without much fuss. My new bearings are sealed, but I have enough experience with cheap Chinese bearings that I thought it wise to pull the seals off and repack them with some quality high-temp grease.
    With that, reassembly was pretty easy. Punch the new bearings and seals into place, and reassemble. The axle had a little bit of rust in the area the seal would ride on, and even though I have sealed bearings I cleaned up the worst of the rust to give my new seals a fighting chance. It's not perfect but it's a phenomenal improvement over what it was.
    Click image for larger version. 

Name:	PXL_20240310_005855868.jpg 
Views:	20 
Size:	545.4 KB 
ID:	271292Click image for larger version. 

Name:	PXL_20240310_005920584.jpg 
Views:	15 
Size:	703.3 KB 
ID:	271293Click image for larger version. 

Name:	PXL_20240310_020201797.jpg 
Views:	22 
Size:	497.6 KB 
ID:	271294Click image for larger version. 

Name:	PXL_20240310_020623126.jpg 
Views:	22 
Size:	461.0 KB 
ID:	271295
    Finally, I took a few minutes to straighten my backing plates and skid plate before reassembly. They aren't perfect, but with some careful ing they're a lot better.
    Click image for larger version. 

Name:	PXL_20240310_022156120.jpg 
Views:	23 
Size:	702.4 KB 
ID:	271296Click image for larger version. 

Name:	PXL_20240310_022901298.jpg 
Views:	21 
Size:	581.4 KB 
ID:	271297Click image for larger version. 

Name:	PXL_20240310_022202455.jpg 
Views:	26 
Size:	579.8 KB 
ID:	271298
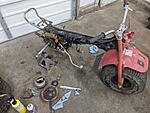
    That leaves me here. Not a lot more to do until some more of my parts come in. Waiting on a flywheel puller, fork bearings, and brake shoes to make more progress.
    Click image for larger version. 

Name:	PXL_20240310_030133477.MP-min.jpg 
Views:	26 
Size:	1.24 MB 
ID:	271299

  2. #17
    Join Date
    Feb 2024
    Location
    McPherson Kansas, USA
    --
    16
    Steering stem bearings came in so I decided I'd do a tear down and rebuild.
    The top nut was missing and the steering stem was very loose. My hope was it would be like the rear end. Worn out and in need of new bearings but very rebuildable... not so.
    Handlebars came off fine and I immediately noticed the bearing preload adjuster was loose. too loose. It came off easily, but the upper bearing race did not. After some taps with a mallet I got it to come apart.
    Click image for larger version. 

Name:	PXL_20240312_021023225.jpg 
Views:	19 
Size:	392.2 KB 
ID:	271306Click image for larger version. 

Name:	PXL_20240312_020619225.jpg 
Views:	17 
Size:	667.3 KB 
ID:	271307
    To my dismay, I found a real mess. The top bearing had no balls at all, and the hardened bearing race has trashed my stem. It looks like the remains of the stem damaged the top of the frame a little too, although not in the bearing area so that should be okay.
    Click image for larger version. 

Name:	PXL_20240312_023408697.MP.jpg 
Views:	30 
Size:	320.8 KB 
ID:	271304Click image for larger version. 

Name:	PXL_20240312_041947380.jpg 
Views:	21 
Size:	471.2 KB 
ID:	271303Click image for larger version. 

Name:	PXL_20240312_022053857.jpg 
Views:	27 
Size:	323.9 KB 
ID:	271305
    I considered straightening what's left of my steering stem, welding it up, and putting it back into service. After thinking about it though, I don't think that's wise. I need a new front fork. I read somewhere that other models might be compatible too, does anyone know for certain what does and doesn't work?
    Click image for larger version. 

Name:	PXL_20240312_041924764.jpg 
Views:	31 
Size:	1.05 MB 
ID:	271302
    I'm disappointed, as new forks wasn't in the budget, but I'm hoping I can find decent replacements in serviceable shape. If I'm truly priced out, I might give welding a try. I certainly can't make it worse than how it is now!

  3. #18
    Footy's Avatar
    Footy is offline At The Back Of The Pack Arm chair racerAt the back of the pack
    Join Date
    Feb 2015
    Location
    Charlotte, N.C.
    --
    334
    I think you can find a set of 110 or 125m forks fairly cheap.
    Put your butt on the inside fender or end up on the ground!

    TRX450ER
    ATC250SX
    ATC350X
    ATC110
    ATC185S
    XR100R
    CRF230F
    Raptor 125
    Breeze 125
    Grizzly700

  4. #19
    Join Date
    Feb 2024
    Location
    McPherson Kansas, USA
    --
    16
    Been a while since I updated, but there has been some major progress.

    Engine is back together. The bored cylinder from Dr. ATV looks great, and went together with no issues.
    Cleaned all the junk out of the inner clutch housing and checked the screen - completely clear.
    Lapped the valves into the head, put a new cam timing chain in, and put it all back together. Still don't have a recoil or carb but as soon as I do, it's ready to run!
    Click image for larger version. 

Name:	PXL_20240315_224832933.jpg 
Views:	22 
Size:	720.0 KB 
ID:	271338Click image for larger version. 

Name:	PXL_20240315_224149156.jpg 
Views:	22 
Size:	512.1 KB 
ID:	271339Click image for larger version. 

Name:	PXL_20240315_222459490.jpg 
Views:	22 
Size:	465.0 KB 
ID:	271340Click image for larger version. 

Name:	PXL_20240315_222107049.jpg 
Views:	21 
Size:	575.7 KB 
ID:	271341
    Also picked up a parts frame with a set of good forks. The frame is a 79 but the forks came off an 85 (I think) as the fender is in a different place. It all fits nicely and these forks are straight and have good bearing surfaces, so it's enough to get me back on three wheels. At this point, it's about as assembled as it was when I first got it, just much better mechanically.
    Click image for larger version. 

Name:	PXL_20240404_201818839.jpg 
Views:	23 
Size:	845.9 KB 
ID:	271342
    In other news, I joined an ATC 110 FB group and found someone who's helping me out with some of the miscellaneous parts my machine is missing.
    The community around these machines is so friendly and helpful, it just makes me more excited to get this one running and riding again!

//ArrowChat Integreation Code //