//ArrowChat Code
Page 1 of 2 1 2 LastLast
Results 1 to 15 of 17

Thread: 250Sx 250ES changing cam chain HELP!!!

  1. #1
    Join Date
    Nov 2013
    Location
    El Paso TX
    --
    52

    250Sx 250ES changing cam chain HELP!!!

    Allright guys who has done a cam chain in a 250SX or 250ES. thought it was a faulty tensioner tried 3 different ones and the chain is just clapped out..... I already got a new head, did valve job, piston, and rings to put it all back together and cam chain whouldnt even drive a damn bicycle...... ik I can get one for like 70$ on ebay but not sure what all I will need to take the clutch and stuff off?? how big a job is it any help or pictures would be sweet!

  2. #2
    Join Date
    Feb 2011
    Location
    Sarnia, Ontario, Canada
    --
    3,415
    I left my secret decoder rIng behind in 3rd grade..maybe you could decipher this message so we can understand what you are asking.

    Pretty sure this is why your 10 hour old post has no response!!
    Current toys..
    1986 Honda 350X..trail bomb!
    1985 Honda 250SX..my main mudder
    1985 Honda 250ES..Back in Black Trike
    Current non-trike toys:
    1990 Honda TRX300FW
    1995 Seadoo GTX
    1998 Polaris Indy Lite 340(Nearly new looking)
    1998 Polaris Touring 500
    1998 Club Car (electric)

  3. #3
    Join Date
    Oct 2013
    Location
    Wherever I May Roam
    --
    3,757
    In addition to the thank button i will personally thank you doug.

    Theres some mixed signals in your post 85xman... extra details, explaination, pics?

    The first thing you need is a copy of the factory service manual for your model.

  4. #4
    fabiodriven's Avatar
    fabiodriven is offline Aspiring romance novel cover model, and the Official 3WW slayer of thieves and swindlers. Catch me if you can
    Join Date
    Jun 2008
    Location
    The woods
    --
    10,515
    Yes the grammar isn't perfect but I'm not going to pretend I don't know what he's saying.

    Personally I've never swapped out a cam chain so I can only offer limited guidance. I do believe you will have to split the cases which is a big job, yes, As suggested get yourself a manual to start and then keep posting here. There are plenty of nice people here willing to help you through this process. It can be done and you sound confident enough to do it so that's half the battle.
    85 Tri-Zinger 60
    85 ATC250SX
    86 ATC250SX
    87 ATC250SX
    02 XR650L conversion
    84 ATC 480R

  5. #5
    Join Date
    Dec 2007
    Location
    Quebec,Canada
    --
    1,012
    Remove clutch cover,both clutch,oil pump and line and you're on.The only real thing to know except for the timing basic,is the clutch nut on the crankshaft is left hand thread.

    1986 ATC500X
    1985 ATC250SX
    1985 ATC200X
    1985 ATC250R
    1986 ATC250R
    1984 ATC250R
    1981 ATC70
    1984 ATC70
    1985 ATC70
    Custom built ATC70 / 250R laydwon swap
    1986 ATC250SX FATCAT

  6. #6
    Larry T Moore is offline At The Back Of The Pack Arm chair racerAt the back of the pack
    Join Date
    Mar 2013
    Location
    Indiana
    --
    358
    yeah..it isnt that hard...change the chain sliders too since youll have the head off...you can only change one with the head still on...but the manual is yer best bet, plus it shows you what all needs to be lined up to reinstall yer side cover

  7. #7
    Join Date
    Nov 2013
    Location
    El Paso TX
    --
    52
    Okay Threewheelerworld gentlemen, I am simply wondering who has changed a cam chain in a 1985-87 Honda ATC 250SX or 1985-87 Honda ATC 250ES.
    I recently purchased a 1985 Honda ATC 250 SX with bent valves, due to and worn out cam chain. I thought the issue was possible a faulty cam chain tensioner. I attempted to use three different cam chain tensioners to finally confirm the timing chain to be completely worn out.
    I purchased a better (used) cylinder head. I did valve grinding job, purchased and new piston, and rings. I am aware that I can purchase a new cam chain online for around 70$ USD. I believe I have thoroughly explained the situation and am currently seeking guidance from an individual who has done this procedure before. Any advice would be very much appreciated, however un-needed rude post based on my prior question (typed via cell phone) will not be needed. Thank you.

  8. #8
    Join Date
    Oct 2012
    Location
    WI
    --
    499
    I just did one a few weeks ago on my 86 250ES. You will need a 27mm Socket, an impact wrench, the clutch cover gasket, ATV gasket sealant, and regular tools such as 8mm socket, 10mm, and 12mm. Pull the rocker cover off, pull out the cam shaft and timing sprocket. Pull the head oil line off, Then pull off the clutch cover, clutches, oil pump, oil line inside the engine, and take the chain off, install new chain, thread it up to the top of the head with a wire, and re assemble. I HIGHLY suggest downloading a manual, It has step by step instructions WITH pictures.
    Here is a manual website link. Owner is KBlony. http://www.atcmanuals.info/
    Good luck.
    1983 ATC 200x
    1982 ATC 250R X2
    1983 ATC 250R : Future build
    1985 ATC 250R : Main rider
    1985 ATC 363R Duner
    1985 ATC 250R X2 : Future build
    1986 ATC 250ES

  9. #9
    Join Date
    Nov 2013
    Location
    El Paso TX
    --
    52
    Great thanks man I assumed it wasn't too bad. I've already got the head and rocker off so it'll be easy just the clutch. I have a manual for all my trike downloaded and printed I was more or less asking before I dug too much into the project of some info but I really appreciate it man!

  10. #10
    Join Date
    Mar 2010
    Location
    Pacific NW
    --
    4,255
    Quote Originally Posted by 85XMAN View Post
    Okay Threewheelerworld gentlemen, I am simply wondering who has changed a cam chain in a 1985-87 Honda ATC 250SX or 1985-87 Honda ATC 250ES.
    I recently purchased a 1985 Honda ATC 250 SX with bent valves, due to and worn out cam chain. I thought the issue was possible a faulty cam chain tensioner. I attempted to use three different cam chain tensioners to finally confirm the timing chain to be completely worn out.
    I purchased a better (used) cylinder head. I did valve grinding job, purchased and new piston, and rings. I am aware that I can purchase a new cam chain online for around 70$ USD. I believe I have thoroughly explained the situation and am currently seeking guidance from an individual who has done this procedure before. Any advice would be very much appreciated, however un-needed rude post based on my prior question (typed via cell phone) will not be needed. Thank you.
    I really wish there was a service limit measurement for those chain tensioners.
    like...with yours, you Know the chain is stretched.
    Now if you could push in against the chain rail guide and measure it, it would save lots of heartache.
    I pulled one out and it had nice oil stains so I knew it wasn't all the way out but still had chain slap noise. Scary stuff for sure.

    Oil filter in correctly? If not, it can starve the head of oil, or so I've heard.
    Wonder why it failed? and sx may have been run a little more aggressively than an es but both are super fun GREAT machines.

    Not an uncommon repair so I'm sure there is lots of good info here, especially from someone who's done it. search key for 'cam chain' ?
    BTW, thanks hatc.
    I just hope I don't have to do one (no garage).
    I have the oldest cell phone and my txt msgs are super archaeic and virtually unreadable with almost no punctuation.
    It has come very close to getting flying lessons lately.
    Please keep us posted and maybe pix, if you can.
    I don't remember the manual specifying reverse threads and not something I'd want to do wrong with lots o' torque.
    If this your first 250, you will be hooked for life and
    'need' a few more.
    Last edited by tri again; 05-26-2014 at 03:02 PM.

  11. #11
    Join Date
    Nov 2013
    Location
    El Paso TX
    --
    52
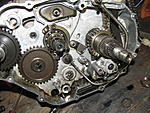
    Okay did a test run on my parts motor; 86' 250ES pretty much the same motor as 250SX. Step by step plus some pictures hope this will help someone!!!

    Step 1: Take Valve cover and cam shaft off/out 8MM and 10MM wrench/ratchet. Pretty simple and self explanatory, (valve cover on right you don't need to remove head but makes the process easier).
    Click image for larger version. 

Name:	02.JPG 
Views:	994 
Size:	1.58 MB 
ID:	194368

    Step 2: Remove kick start and clutch cover, 8MM wrench/ratchet
    Click image for larger version. 

Name:	01.JPG 
Views:	922 
Size:	1.88 MB 
ID:	194369

    Step 3: Remove oil line, it just pulls out, be careful not to bend excessively.
    Click image for larger version. 

Name:	1.JPG 
Views:	554 
Size:	1.40 MB 
ID:	194370

    Step 4: Take centrifugal clutch nut off using 27MM socket (LEFT HAND THRED). And simply pull clutch off.
    Click image for larger version. 

Name:	2.JPG 
Views:	924 
Size:	1.40 MB 
ID:	194371Click image for larger version. 

Name:	3.JPG 
Views:	2040 
Size:	1.85 MB 
ID:	194372Click image for larger version. 

Name:	4.JPG 
Views:	365 
Size:	1.88 MB 
ID:	194373

    Step 5: Remove 4 bolts, plate and springs off manual clutch. Take manual clutch nut off 27mm (RIGHT HAND THREAD), and slide manual clutch off.
    Click image for larger version. 

Name:	5.JPG 
Views:	607 
Size:	1.54 MB 
ID:	194374Click image for larger version. 

Name:	6.JPG 
Views:	529 
Size:	1.48 MB 
ID:	194375Click image for larger version. 

Name:	7.JPG 
Views:	531 
Size:	2.02 MB 
ID:	194376

    Step 6: Take two bolts off that are holding oil line on 10MM wrench and remove oil line.
    Click image for larger version. 

Name:	8.JPG 
Views:	1377 
Size:	1.43 MB 
ID:	194377

    Step 7: Take three bolts out of oil put 8mm wrench, and simply slide oil pump and gears behind off at one time.
    Click image for larger version. 

Name:	9.JPG 
Views:	831 
Size:	1.70 MB 
ID:	194378Click image for larger version. 

Name:	10.JPG 
Views:	890 
Size:	1.68 MB 
ID:	194379

    Step 8: Now your chain is exposed, take old one off put new one on feed up through the cylinder, head, and onto your upper cam gear. As far as I know reverse the process to put back together. Look at manual for torque specs. please look back at my pictures and ask any questions. Hope it helps!
    Click image for larger version. 

Name:	11.JPG 
Views:	1442 
Size:	1.94 MB 
ID:	194380

  12. #12
    Join Date
    Mar 2010
    Location
    Pacific NW
    --
    4,255
    Quote Originally Posted by 85XMAN View Post
    Okay did a test run on my parts motor; 86' 250ES pretty much the same motor as 250SX. Step by step plus some pictures hope this will help someone!!!

    Step 1: Take Valve cover and cam shaft off/out 8MM and 10MM wrench/ratchet. Pretty simple and self explanatory, (valve cover on right you don't need to remove head but makes the process easier).
    Click image for larger version. 

Name:	02.JPG 
Views:	994 
Size:	1.58 MB 
ID:	194368

    Step 2: Remove kick start and clutch cover, 8MM wrench/ratchet
    Click image for larger version. 

Name:	01.JPG 
Views:	922 
Size:	1.88 MB 
ID:	194369

    Step 3: Remove oil line, it just pulls out, be careful not to bend excessively.
    Click image for larger version. 

Name:	1.JPG 
Views:	554 
Size:	1.40 MB 
ID:	194370

    Step 4: Take centrifugal clutch nut off using 27MM socket (LEFT HAND THRED). And simply pull clutch off.
    Click image for larger version. 

Name:	2.JPG 
Views:	924 
Size:	1.40 MB 
ID:	194371Click image for larger version. 

Name:	3.JPG 
Views:	2040 
Size:	1.85 MB 
ID:	194372Click image for larger version. 

Name:	4.JPG 
Views:	365 
Size:	1.88 MB 
ID:	194373

    Step 5: Remove 4 bolts, plate and springs off manual clutch. Take manual clutch nut off 27mm (RIGHT HAND THREAD), and slide manual clutch off.
    Click image for larger version. 

Name:	5.JPG 
Views:	607 
Size:	1.54 MB 
ID:	194374Click image for larger version. 

Name:	6.JPG 
Views:	529 
Size:	1.48 MB 
ID:	194375Click image for larger version. 

Name:	7.JPG 
Views:	531 
Size:	2.02 MB 
ID:	194376

    Step 6: Take two bolts off that are holding oil line on 10MM wrench and remove oil line.
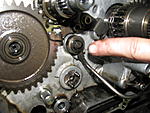
    Click image for larger version. 

Name:	8.JPG 
Views:	1377 
Size:	1.43 MB 
ID:	194377

    Step 7: Take three bolts out of oil put 8mm wrench, and simply slide oil pump and gears behind off at one time.
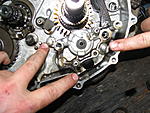
    Click image for larger version. 

Name:	9.JPG 
Views:	831 
Size:	1.70 MB 
ID:	194378Click image for larger version. 

Name:	10.JPG 
Views:	890 
Size:	1.68 MB 
ID:	194379

    Step 8: Now your chain is exposed, take old one off put new one on feed up through the cylinder, head, and onto your upper cam gear. As far as I know reverse the process to put back together. Look at manual for torque specs. please look back at my pictures and ask any questions. Hope it helps!
    Click image for larger version. 

Name:	11.JPG 
Views:	1442 
Size:	1.94 MB 
ID:	194380
    You're my freakin' hero.
    Thanks so much for posting the carnage.
    I'm next, but thanks to you, I have something to dream about.

    Seriously, I reeeeeally appreciate that you took time to take pix.\Not easy to do in the midst of flying tools.
    All ya gotta worry about now is trying NOT to get more.

    You're gonna love it

  13. #13
    Join Date
    Nov 2013
    Location
    El Paso TX
    --
    52
    Not a prob if I had found a thread like this I never would have spent 4 hours carefully figuring it out haha. glad I could help. I am goin to be looking back at my pix as I do the actual chain in the 250sx when the chain comes in I HATE MAIL!!!

  14. #14
    Join Date
    Mar 2014
    Location
    quebec canada
    --
    8
    Thanks a million.... how would i set timing after
    Changing the chain thank you would be very appreciated!

  15. #15
    Join Date
    Aug 2014
    Location
    South Louisiana
    --
    1,915
    Cam shaft must be set lobes down. Remove the 2 small plugs on the flywheel cover.(left side) One has a 17mm nut the other is to see the "T" mark on the flywheel. With a 17mm socket turn the flywheel until the "T" mark lines up with the index arrow mark. Line the cam sprocket where the 2 lines on it are even w/ the top of the head case. Thread the first bolt into the camshaft sprocket. Turn the flywheel until the camshaft turns 180 degrees. Thread the second cam sprocket bolt and torque to spec. Turn the flywheel until the camshaft is again lobes down. Torque the first cam sprocket bolt to spec. That should be it. Just make sure that when the index mark is lined up with the "T" the 2 lines on the sprocket are lined up with the top of the head and you should be good to go.
    "Roll on 3"

    RIP Ol' Deuce

    "Long Live the ATC"
    Building: ATCr125x
    Riding: ATC200sx
    "I am not a mechanic, mechanics get paid for this. I do it because I enjoy it."

//ArrowChat Integreation Code //